Certificate on esxi 6.7 / 7.0

You have a vmware server without a connection to vsphere, you want to have a valid certificate from a third party supplier like digicert.com og ssls.com installed on the server.

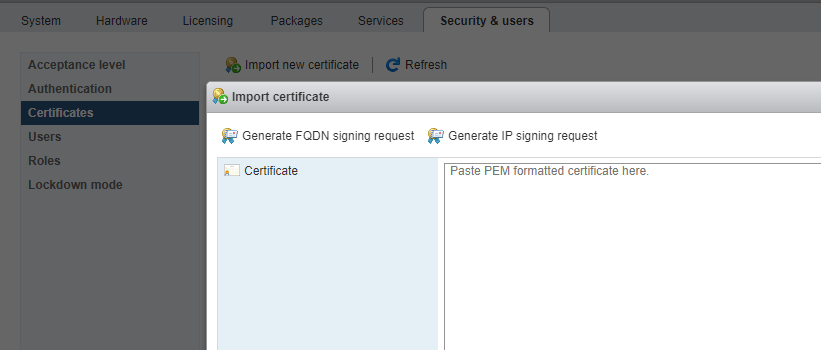
You might think you should use the guide “Generate FQDN Signing request” from the web interface but you are wrong. Don’t use this funktion.

Do not use this

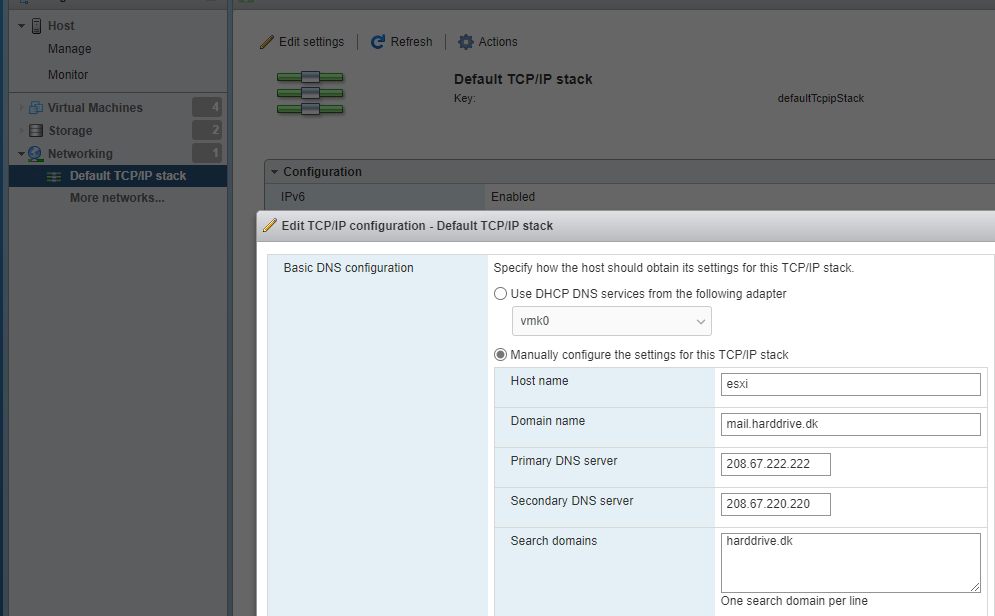
Start setting up your server with at FQDN (hostname). Go to networking/default “TDC/ip stack” fill out domain name.

1.Now it is time to buy a ssl ssl certificate.

Save the private key CSR on your pc

-----BEGIN PRIVATE KEY-----
MIIEvQIBADANBgkqhkiG9w0BAQEFAASCBKcwggSjAgEAAoIBAQDJAACvfZgtxSST
lJv9HSKIOkPQmZt9ISmnOK/TJI4bPe/zckWUIrsm/Im9c7ah8icEui/wbxfB+u51
4jTpxIOiuCkjRwfu6qKDGy5wMZeqvmx+vwttuT+xybx+B/ZJuif8UwBVkemEEd5E
P+H8akm3nHNVMeHvma663Ze5sqCjKCO78Plcah5YbfTUnTcGLMkc2P+cfmfdMhHk
1L/xmn1P/HdrXpdJ+si2Lea7I9ZNg9qA51YAd73PybcurpLw5TZj6Zg1DLWJj7ce
3nqTUJVf4mWWgRaa6CwcjmwNk2La9hsoUcqfgx6PeoklxbCXMhzQs1YEUnSBRnkt
VHKj8S7DAgMBAAECggEAC8PQRnVXfvZXGbxNFRerecXPSlpzW3OheIQ85mLxXm7V
qK47nFwcEEAf39LyEbCW0BQF0lDuVxBU/Nlst3IlMlUNM19o+3cIZBwnL7H3aqsS
tqiABsAdFk70lXvp0o7u4DoLfva3cF+LXvtOQvQFtJWXupjc3KVmMNHfm6L0/Be2
sovx61OMQuTEhIJLNUiLLcY9aJ79/FBIiBRtzwuxhzaQ5xTcWFH7DD3EQehunTkM
fXhDkIpv3T9CcS4wsuQUY6MYB2rPRu22v3SNCB9aKFFHHjkuJ34ZmrAcGi7dURau
5ytFZr+qssBqBDrhfM+I8EyyyNK3/L8mLf6riyRyAQKBgQD5mkTrKk2VKxoxgQC9
pB6fQ43/7AptseCeNj2JRZhABnlOcVpgzk4I9W3sORaoaMyd4ygNiJuZJ1ubKzNM
lGgKs+uDxserFfU3jQxILMNRHJe9IVq0xZ371iotFYPVVB29CHCy4+rqATs4RLPi
kYgMog67hxbuk7+pRTcONt+RwQKBgQDOJtWq8OEI4XI75oKZcdJWRhya3DSJkJsS
fWijntQFCOfKXkUeYReRsK3LA3lBzcfwosTR5BsdeLSahBtQ94gp1neP28tmss2j
y8t9olJi+8nC6x6dj3kY/4lumV1EYxMYmGSojIp+mtpcDEE00QIJyVyW6tizE8Hg
6jGT0j3ZgwKBgAblt2/ULG6p0UB68x1Kcrot8LeYuzUKzE0y7IJllO53/1Qml7vD
F67xsUbs0O54bucSBuJQ2xPhXYutJu6/zxw0mpZ6oLvekHcng6Ze7krIgnzsdgg2
ycXSxjmWtZzohSXbHNokqDItNIi6hUoGgX7v335ZHk4bcRlpWzseUxFBAoGAc4iu
LMwswiZfOBTa0pZItFM8yslopEQntHgWQcTMvDmedfrZL8poRB1JeUJsHaXvTPxb
4+m8DItOZF5vVLQ1WoU4oqYi216QAyE+3R0woQrNq3DLyq/SxWDJK/PFooMH+7vE
hfWl1IiCoh24GZqdUtDIFEhvxATpnlyCBn9IbHMCgYEAwGaKiDykIWXT0d6X3lad
gLIqRR5lpdLi8c1TuAZCpxl+cFijsDQwGekKnlmk8T/414hTWM5rL63LeIoabYJH
D1dPV65QsTQKAk1yK4qcrOX3RWq15bHXMPzB5vKLQmQkT0cxYVMTJYLGIHwwlKCZ
s4auwoKqySd1ehGWUvKDTrg=
-----END PRIVATE KEY-----

Verify your certificate by e-mail.
Download dit certificate.
Rename your certificate to rui.crt
Rename your private key til rui.txt
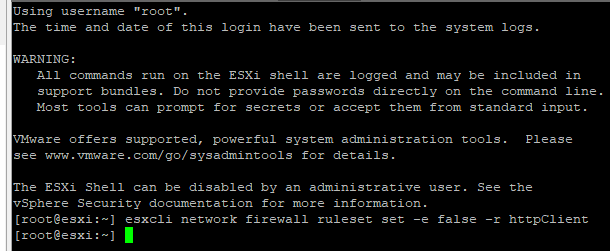
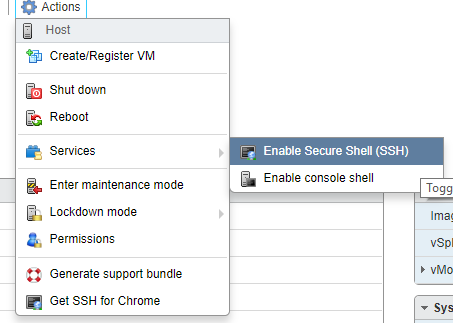
Enable ssh on the esxi server

Set your server in maintenance mode

Install Winscp. Login with root and upload the 2 files to: Befor your upload make a backup of the 2 files.

cd /etc/vmware/ssl

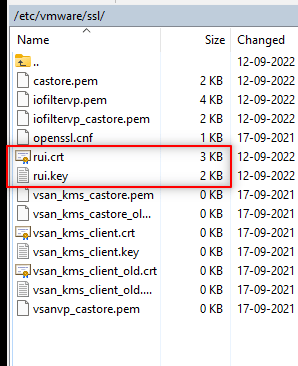
Restart your esxi server

DNS

Make a “a record” pointing to your domain.

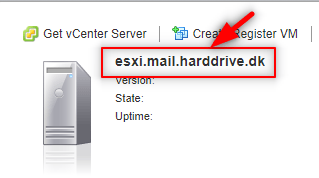
test the connection in a new browser

valid certificate

VMWare quiescing error

1. check if the VM (s) has an actual version of the VMware tools installed
2. check if the ‘VMware tools’ service is up and running on the guest machine
3. login to the vSphere client
4. check that the quiesce snapshot can be created:
• right-click the VM>Snapshots>Take snapshot
5. If you are unable to create the quiesce snapshot, check the following:
• the error stack raised by the vSphere client
• the event viewer logs on the guest machine:
• [warning] [vmvss:vmvss] CVmSnapshotRequestor::UnregisterProviderImpl():1878: failed to unregister provider, error 0×80042307 (I)
• [warning] [vmsvc:vmbackup] Failed to send vmbackup event to the VMX: Unknown command.
If you get the above mentioned warnings:

1. go to the services.msc
2. locate the ‘VMware snapshot provider’ service
3. disable it

Check event viewer.
Check ledig plads på server
Check at shadow copy kører som det skal ved at højreklikke på C:
Fjen overflødig software.
Prøv også at starte en comman promt med admini: sfc /scannow
Genstart computer.
9/11-20

Ny fejlmulighed kan være at tiden på wmware ikke er synkroniseret med de andre maskiner.

Via denne vejledning kan man kontrollere opsætningen af tiden Edit Time Configuration of an ESXi Host in the VMware Host Client, og det er også muligt at starte tids synkronisering der. Hvis man når man i wmware forsøger at starte tidssynkronisering får fejlen “The service ntpd failed to start” kan denne vejledning hjælpe til at løse problemet:

https://www.vblog.nl/esxi-7-0-standalone-the-service-ntpd-failed-to-start/

Sende logfiler

ved hjælp af denne bat fil. VSSLogs.bat


__________________


rem FILENAME: VSSLogs.bat 
rem 
vssadmin list writers > “C:ProgramDataMXBBackup Managerlogsvsswriters.txt” 
vssadmin list providers > “C:ProgramDataMXBBackup Managerlogsvssproviders.txt” 
vssadmin list shadowstorage > “C:ProgramDataMXBBackup Managerlogsvssshadowstorage.txt” 
wevtutil epl application “C:ProgramDataMXBBackup ManagerlogsApplication.evtx” 


wevtutil epl system “C:ProgramDataMXBBackup ManagerlogsSystem.evtx”
_____________________


Zip denne programmappe og send til maxbackup


C:ProgramDataMXBBackup
Managerlogs 


Man kan opleve at der opstår “quiescing error” hvis man har konverteret en virtuel maskine med vmware converter.
Følgende parameter skal tilføjes på den virtuelle maskine: disk.EnabledUUID FALSE

Find din virtuelle maskine – højreklik -> vælg ”Edit
settings”
Vælg ”VM OPTIONS” i toppen
Gå til ”Advanced”

Vælg nu ”Edit Configuration”

Find ”disk.EnabledUUID” – Står som default til TRUE – skriv i stedet ”FALSE”
Genstart nu din virtuelle maskine


Opdatering af VMware via internettet eller offline .zip

esxcli software profile update -d /vmfs/volumes/datastore1/Esxi70/VMware-ESXi-7.0U3-18644231-depot.zip -p ESXi-7.0U3-18644231-standard --no-hardware-warning

Denne gut har de vise sten.

https://www.vladan.fr/how-to-upgrade-esxi-6-0-to-6-5-via-cli-on-line/

Luk alle dine vmware maskiner.
Start med at genstarte din vmware server

Sæt din vmware server i maintencemode

enable ssl

Login til din esxi server via putty

Tillad http:// i firewall

esxcli network firewall ruleset set -e true -r httpClient


Få en liste over de profiler du kan download og opgraderer til


esxcli software sources profile list --depot=https://hostupdate.vmware.com/software/VUM/PRODUCTION/main/vmw-depot-index.xml | grep -i ESXi-6.7

giver en liste over alle de versioner der er af 6.7
Eller få en liste her: https://www.virten.net/vmware/vmware-esxi-image-profiles/

Lav en test af opdateringen med dry run

esxcli software profile update -f -d https://hostupdate.vmware.com/software/VUM/PRODUCTION/main/vmw-depot-index.xml -p ESXi-6.7.0-20190801001s-standard --dry-run

pas på line brakes

sådan ser den ud for update3


Lave opdateringen

esxcli software profile update -d https://hostupdate.vmware.com/software/VUM/PRODUCTION/main/vmw-depot-index.xml -p ESXi-6.7.0-8169922-standard


Maskinen er nu opdateret


Genstart maskinen

reboot

enable firewall

esxcli network firewall ruleset set -e false -r httpClient

Fjern maintence mode

Opdater med Offline pakke

Start med at downloade en offline pakke af esxi 7.0 f.esk VMware-ESXi-7.0.0-15843807-depot.zip
Upload den til en mappe i et datastore.

Start med at køre denne kommando:
esxcli software profile update -d /vmfs/volumes/datastore1/Esxi70/VMware-ESXi-7.0.0-15843807-depot.zip -p ESXi-7.0.0-15843807-standard --dry-run
 
Hvis det går godt kør
esxcli software profile update -d /vmfs/volumes/datastore1/Esxi70/VMware-ESXi-7.0.0-15843807-depot.zip -p ESXi-7.0.0-15843807-standard

Her er kode for update3

esxcli software profile update -d /vmfs/volumes/datastore1/Esxi70/VMware-ESXi-7.0U3-18644231-depot.zip -p ESXi-7.0U3-18644231-standard --no-hardware-warning
 
Skriv 
reboot
 
Note: Hvis du ikke ved hvad dit datastore hedder  skal du bare skrive:


esxcli storage vmfs extent list
 
~ # esxcli storage vmfs extent list
Volume Name  VMFS UUID                            Extent Number  Device Name                                                                 Partition
-----------  -----------------------------------  -------------  --------------------------------------------------------------------------  ---------
datastore1   52a0db3f-d87636dc-61bb-28924a2f1bc0              0  t10.ATA_____VB0250EAVER_____________________________Z3TDY30B____________            3
datastore2   53f6103b-e2c46411-13e9-28924a2f1bc0              0  t10.ATA_____WDC_WD1600AAJS2D00L7A0________________________WD2DWCAV36165769          1


Hvis den skriver at [error] 28 No space left on device

Kig på denne artikel

Eller gå ind og ændre placering for SWAP fil

https://www.starwindsoftware.com/blog/what-should-you-do-if-no-space-left-on-device-error-occurs-while-updating-vmware-esxi


Lave Opdateringen

the disk is offline because of policy set by an administrator

Sådan får du din disk online igen
start cmd
Kommandoer står med gult.

C:UsersAdministrator>diskpart

Microsoft DiskPart version 10.0.14393.0

Copyright (C) 1999-2013 Microsoft Corporation.

DISKPART> san
SAN Policy  : Offline Shared
DISKPART> san policy=OnlineAll

DiskPart successfully changed the SAN policy for the current operating system.

DISKPART> list disk

  Disk ###  Status         Size     Free     Dyn  Gpt
  ——–  ————-  ——-  ——-  —  —
  Disk 0    Online           90 GB      0 B
  Disk 1    Offline        1861 GB  1024 KB

DISKPART> select disk 1

Disk 1 is now the selected disk.

DISKPART> attributes disk clear readonly

Disk attributes cleared successfully.

DISKPART> list disk

  Disk ###  Status         Size     Free     Dyn  Gpt
  ——–  ————-  ——-  ——-  —  —
  Disk 0    Online           90 GB      0 B
* Disk 1    Offline        1861 GB  1024 KB

DISKPART> attributes disk
Current Read-only State : No
Read-only  : No
Boot Disk  : No
Pagefile Disk  : No
Hibernation File Disk  : No
Crashdump Disk  : No
Clustered Disk  : No

DISKPART> list disk

  Disk ###  Status         Size     Free     Dyn  Gpt
  ——–  ————-  ——-  ——-  —  —
  Disk 0    Online           90 GB      0 B
* Disk 1    Offline        1861 GB  1024 KB

DISKPART> online disk

DiskPart successfully onlined the selected disk.